
 Git is a version control system used by development and programming teams, popular open source projects, and other team collaboration projects. In this Git guide, we will discuss the value of version control systems, an overview of Git, advantages and disadvantages of using Git, how to install Git, basic commands, tools and essential Git resources. (For designers, also check out The Ultimate Guide to Version Control for Designers.)
What Is Version Control?
Essentially a version control system (or a revision control system) is software that has the ability to manage and track changes that occur to any document that is in a given project.
In other words, you have the ability to take “snapshots” of your files during your current body of work, and you will be able to return to any of these snapshots whenever you wish. It provides a history of what you did, when you did it and what files you did it to. Do not think of these snapshots as backups because with a backup you have a separate copy of a file.
With a version control system, this all happens seamlessly in the background using databases. The disk space used for keeping version information is minimal. The other advantage of a version control system is that you don’t have multiple backup files to manage.
Git is a distributed revision control system, which just means that if you have multiple people in a project, they can work individually without being connected to a central network, and then they can just push to the project when they are ready. A key benefit of version control is being able to have several people working on the same document at once. You then will have the ability to merge these changes so that each member can work on the same file without fear that they are affecting each other’s work.
Pretty cool, eh?
Who Should Use a Version Control System?
Anyone who works with files on a regular basis — whether it’s for developing a web app, building a static website, managing an open source project, or heck, even teams working on MS Office documents — should look at version control. Historically, version control systems have been associated with developers and programmers because they normally deal with source code files (which are essentially text files) and because they work in teams where different members may be dipping in and out of various files.
Imagine having 5 developers working on the same project: managing 5 files would mean 20 more files to deal with. Most projects will have many, many files and even more developers– and as you can soon imagine, it can become quite a nightmare.
Git Overview
Git is one of the many version control systems out there and whilst I haven’t tried every system under the sun, I have tried a few of the well-known ones and Git comes out on top.
A few other version control systems are:
- Bazaar
- Subversion
- TortoiseCVS (GUI for CVS)
Git was created by Linus Torvalds (the founder of Linux) because he really didn’t like Concurrent Versions System (CVS), which, at the time, was the most popular version control system. Torvalds wanted something to help keep versions of the kernel he was working on and he figured that he would have to build a system of his own. Git is an open source project, and since Torvalds’ initial development, there have been many other primary authors and contributors to the project.
Here’s an excellent video you should watch of Torvalds explaining Git in a Google Tech Talk.
Advantages of Using Git
- Git is super easy to install: I will take you through the installation process – it’s a breeze.
- Git is easier to learn compared to other systems: by the end of this guide, you will have enough knowledge to get going with Git.
- Git is fast: So much so that it doesn’t become one of those things you have to force yourself to remember to do and you can integrate it seamlessly with your current workflow.
- Git is decentralized: If many people are working on a project, they each can have their own copy and not save over each other.
Disadvantages of Using Git
- Git has a learning curve: Whilst I did say that it’s one of the easier version control systems to use, any new thing you introduce to your workflow will need some learning time. Learning Git will be similar to learning a new software application such as Word or Excel.
Installing Git
Git is available for Windows, Mac OS X and Linux. Installing it is surprisingly easy. 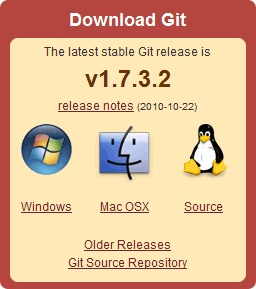 To start, go to the download page of Git, found here:
You can of course get your hands on the source of the project itself, including nightly builds if you want to be a bit more adventurous, but I would just stick to stable releases for now.
Mac OS X Git Installation
You simply download the dmg file, double-click on it and away you go. You can also use MacPorts, but the dmg file is a nicer experience and has more options.
Windows Git Installation
You have two options on Windows. The easiest and quickest way to install Git on Windows is to download the msysGit exe file from Google Project Hosting. msysGit is Git for Windows.
Once installed, Git will be automatically compiled, which is nice. It also gives you GUI modifications, particularly, giving your right-click an additional contextual menu for Git operations. The second option is Git on Cywgin, which is the route I would recommend at first until you get familiarized with how Git works fundamentally.
Cywgin is one of the handiest Windows tools you can download because it allows you to run a Linux-like environment in Windows. When you set up Cywgin, you will have an option to add Git to your system and then you’ll be ready to go.
Linux Git Installation
There are some RPMs and Debs available if you want to use your package manager to install Git for you, but installing from source is easy enough.
Download the source package and make sure you have the following dependencies: expat, curl, zlib, and openssl. Once you have what you need, you can call your normal make/build commands.
Testing Your Git Installation
The first thing you will want to do after installing Git is to ensure that your install went OK.
The easiest way to do this is to type the following into the command line:
git --version
If it worked, you should see something like this: 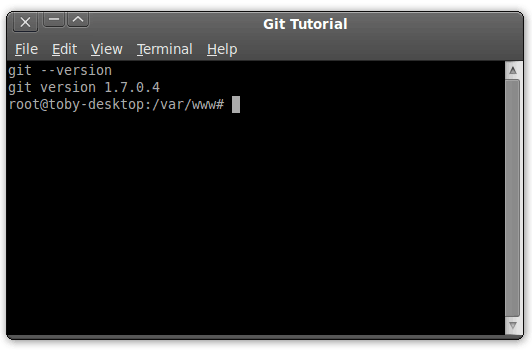 If you issue the command and you get nothing back, or you get some sort of error message, we can assume that Git wasn’t installed correctly. If this is the case, look over the Git documentation and go from there.
Creating a New Repository
Now, let’s start actually using Git.
The first thing we will want to do is make a new Git repository. A repository is just the directory where Git will keep an eye on things for you. You can create repositories for each of your projects.
In the command line, browse to the directory you want to make into a Git repository. Better yet, create a new directory. Once you are in the directory, type the following command:
git init
If it worked, you should see something similar to this: 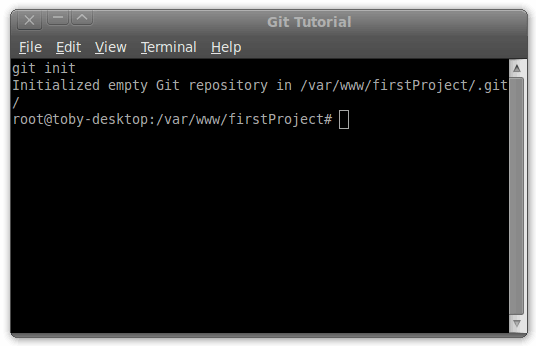
Adding Files to the Repository
Git will now be keeping a watchful eye on anything that happens in the directory we initiated.
Of course, there is nothing in there to watch or do anything with yet. We can change that by adding something to the repository. Do that now by creating a small text file.
I called my file filename.txt and placed “Hello World!” inside it. Once you have created the text file in the directory, we need to tell Git to track it, which just means that it will monitor the file for changes. The command for adding files is:
git add *
This command says to Git, “add everything in the current directory.” If you wanted to be more specific, you could have written:
git add filename.txt
Committing Files
The Git add command is normally followed immediately by the Git commit command.
When we commit something, we are saying that we want this to be a snapshot of our work. When we commit a file in Git, we need to give it a commit message. The commit message just explains what we are committing and why.
Think of your commit message as sort of your notes on the particular snapshot of the file. The command for committing is:
git commit -a -m "This is my commit message!"
The last bit within the quotes is your commit message.
Running add and commit
Let’s run both the add command and the commit command and then look at the output.
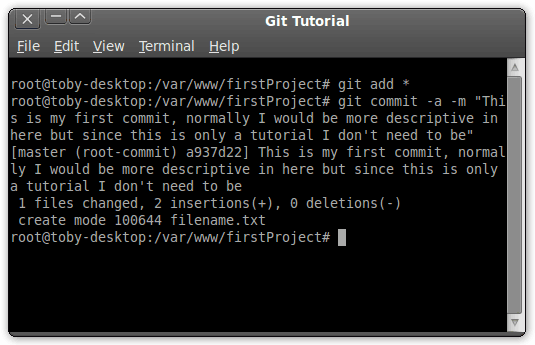 The output you get essentially reads back your commit message and tells you what files have changed and how they’ve changed. In my case, we find that:
- 1 file has changed in the repository (we only have 1 file)
- 2 insertions were made (my file is two lines long)
- 0 deletions (nothing was removed)
- The last line explains that Git had to create the file because it didn’t exist before
Seeing Changes to Files
Now that we have committed our text file, we can continue on our merry way. Let’s assume that the next thing we need to do is add a new line to our text file. So we change our text file and add a line or two, and then we grab some coffee.
Coffee turns to lunch and by the time we get back to our workstation, we have forgotten what we just did. Never fear because Git has a command to help. We can issue the following command:
git diff
The diff command will tell you what has changed between an uncommitted file or the current file you’re working on versus the last commit you made.
After making some changes to your text file and saving the file, running the diff command will show us this output: 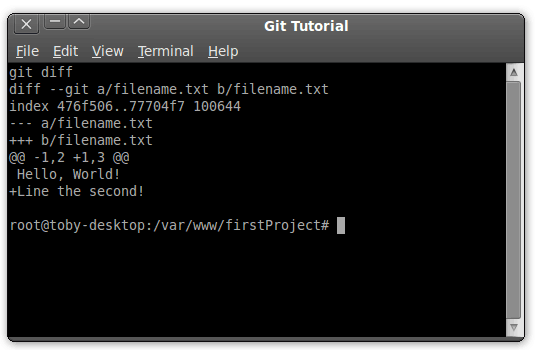 This tells us that
 filename.txt has changed and between a/ (the committed version of the file) and b/ (the most recent version of the file). The thing that has changed is that a new line has been added (and the line that was added says, “Line the second!”). The line saying “Hello, World!” hasn’t been touched, but Git has added the text near the edited line so that you have a bit of context.
Once you have confirmed that all the changes you want to make in this commit are made, then we can commit it again using the commit command.
Logging and Reverting Back to Previous Commits
Let’s say that we’ve committed our repository files and it’s time to go home. You get home, you have dinner, watch your TV shows, and now you’re headed to bed.
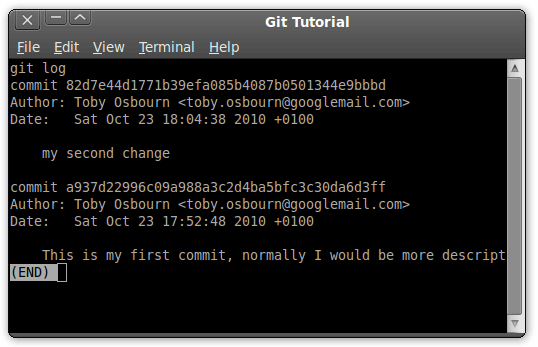
Then you suddenly realize that your CSS stylesheet changes were terrible today and you know you wouldn’t get to sleep knowing you’ve committed some bad code. What you can do is to go back to your previous commit. But first, what you want to do is get a log of your commits.
Just issue the following command:
git log
 The
The log command will give you the commit hash (the unique ID of your commit), the author of the commit, and the date/time it was committed. The most important bit of information for us in order to revert back is the commit hash. Copy the commit hash that you want to ignore.
Then you want to issue the following command, replacing [YourHash] with the hash you copied:
git revert [YourHash]
The revert command will bring up an editor which will allow you to change the commit message. You can just quit out of the editor if you don’t want to make any changes and your revert will be complete. You can confirm the success of your revert by opening up the file.
The things you changed in the commit should be gone and you will be left with your original file.
Exploring Git Further
Now that you know the basics of using Git, you can begin exploring it more and figuring out the best workflow for your given style. One important notion I want to say is that Git doesn’t have to be used in the command line.
Learning how to use Git through the command line gives you great fundamental knowledge of how the system works, but after you know the basics, you may want to use some tools that can enhance your Git experience. Another benefit of mastering Git through the command line is that you will be able to use Git regardless of what operating system you are currently using. However, there are many tools available at your disposal to make Git easier.
What we will discuss next is the Gitk repository browser, Git commands and tools you will likely be using regularly and a few external tools that can enhance Git.
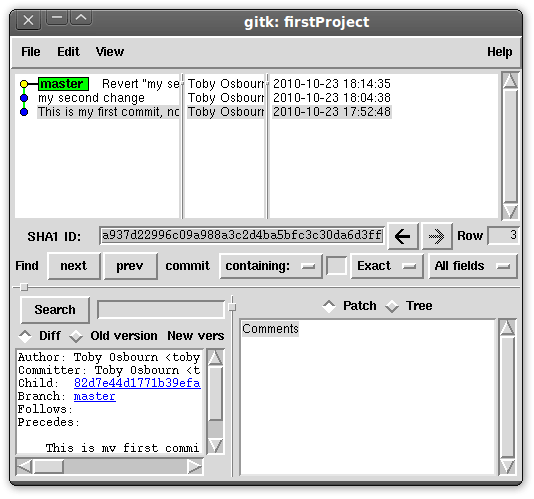
Gitk
One tool that comes bundled with Git is Gitk. Gitk is a Git repository browser, and it is a GUI for your projects.
Type in the following command to access Gitk:
gitk
Helpful Git Commands
Here are some Git commands I use daily. There are many Git features that I have never used before or have only used once (the system has a massive feature set).
add— For adding new files to your projectcommit— For committing changes to your projectpush— We push all our code to a central repository so all the devs can share their code. Features likepushare what make Git a really powerful toolpull— This is what you use to grab someone else’s code, the opposite ofpushbranch— If you want to branch off from the main commit and try something different (for example, if you would like to test something), the original branch will stay untouched while you work awaymerge— You can merge a branch back to the main code baseclone— When I want to clone a new repository from someone, this will bring down the master branchgitk— The visual tool for what you have been doing in Git
A Few Git Tools
- Gitx — a nice GUI for viewing your repository information
- Gity — all the features of Gitx above and then some – I have been able to integrate it with Coda pretty well
- Redmine — this is a web service you can download and install for free that has plug-ins for integration with Git; use it for tracking bugs, issues and development cycles as well as adding more information about commits
- GitHub — web-based source code hosting
Essential Git Resources
- Official Git documentation — the project’s official docs page
- Official Git Wiki — community-driven documentation of Git
- Git Reference — a nice reference site for basic Git use
- Everyday GIT — Information about the 20 (or so) most popular Git commands
- Git – SVN Crash Course — a quick tutorial on getting up and running with Git
- Version Control for Designers — a workflow guide on using Git oriented towards designers
- Git User’s Manual — a comprehensive reference and guide to Git
Wrapping Up
I have only scratched the surface of what version control, and Git in particular, can do for you and I would like to suggest that once you’re done with this guide, that you go out and play around with Git, as well as read up on the essential Git resources that I have mentioned above. Take a look at some of the more advanced features of Git. Even though it might seem intimidating and a lot of work at first, using a version control system will really make your life a whole lot easier in the long run.
Related Content
- The Ultimate Guide to Version Control for Designers
- How to Make Remote Team Collaboration Work
- Collaboration Tips for Designers Working with Developers
-
 President of WebFX. Bill has over 25 years of experience in the Internet marketing industry specializing in SEO, UX, information architecture, marketing automation and more. William’s background in scientific computing and education from Shippensburg and MIT provided the foundation for MarketingCloudFX and other key research and development projects at WebFX.
 -

WebFX is a full-service marketing agency with 1,100+ client reviews and a 4.9-star rating on Clutch! Find out how our expert team and revenue-accelerating tech can drive results for you! Learn more
Make estimating web design costs easy
Website design costs can be tricky to nail down. Get an instant estimate for a custom web design with our free website design cost calculator!
Try Our Free Web Design Cost Calculator
Share this article


Web Design Calculator
Use our free tool to get a free, instant quote in under 60 seconds.
View Web Design CalculatorMake estimating web design costs easy
Website design costs can be tricky to nail down. Get an instant estimate for a custom web design with our free website design cost calculator!
Try Our Free Web Design Cost Calculator


